X
Receive information tailored to you
X
Leave your details below and one of our specialists will contact you shortly to provide more information and answer any questions.
In the world of hauling and transporting, versatility is the key to efficiency. Enter the multi-purpose utility trailer – a true game-changer for those seeking a flexible and practical solution for various tasks.
Let’s dive into the numerous advantages that come with owning a multi-purpose utility trailer and how it can revolutionize the way you handle your hauling needs

Owning a multi-purpose utility trailer is a strategic investment for those who value versatility, efficiency, and convenience in their hauling endeavors. Whether you're a homeowner, business owner, or outdoor enthusiast, the advantages of owning a multi-purpose utility trailer extend beyond mere transportation – it's about embracing a versatile tool that adapts to your ever-changing needs. Upgrade your hauling experience and unlock the potential of on-demand versatility with a multi-purpose utility trailer today.
Enhance your truck's functionality and organization with the innovative DECKED truck bed system. This groundbreaking approach redefines traditional truck storage, offering an unmatched combination of efficiency, security, and organization. Whether you're a professional needing reliable tool storage or an outdoor enthusiast seeking a versatile transport solution, the DECKED system is designed to meet a wide range of needs and activities.
The DECKED truck bed system is a groundbreaking innovation designed to redefine how truck owners utilize their vehicle's space. It transforms the traditional truck bed into a dual-level storage solution. The system includes a raised deck that sits atop the truck bed, featuring robust and durable built-in drawers underneath. This unique design offers an ideal combination of secure storage and easily accessible flat space above.
By optimizing your truck’s cargo area, the DECKED system significantly enhances the overall utility of your vehicle. The upper deck provides a sturdy platform for transporting large items or additional cargo, while the drawers underneath serve as a secure, organized space for tools, equipment, and personal belongings.
The beauty of the DECKED system lies in its versatility. It is perfectly suited for a wide range of applications and lifestyles. For professionals in construction, landscaping, or any trade requiring the transportation of tools and materials, the DECKED system offers a convenient and secure way to manage and access everything you need on the job. Outdoor enthusiasts will appreciate the system’s ability to neatly store sports equipment, camping gear, or hunting supplies, keeping them dry, organized, and ready at a moment's notice.
Additionally, the DECKED system is designed with attention to the ease of installation and use. It integrates seamlessly with your truck bed, maintaining the vehicle's original functionality while adding a new layer of efficiency and organization. Whether you're using your truck for work, leisure, or daily tasks, the DECKED truck bed system enhances your experience by turning your truck bed into a more functional, secure, and organized space.
Investing in a DECKED truck bed system brings a multitude of benefits that transform your truck into a more functional, secure, and efficient vehicle. Let's delve into the key benefits of installing a DECKED system and how it can revolutionize your truck's utility.
The DECKED truck bed system comes with lockable drawers, offering a secure space for storing valuable tools and equipment. This security feature is crucial, especially when parking in public places, as it keeps your belongings safe from theft and unauthorized access.
Ease of access is a major advantage of the DECKED system. The drawers are designed to slide out effortlessly, providing convenient access to your items without the need to climb into the truck bed. This accessibility saves time and effort, especially for professionals who need quick access to their tools on the job.
Durability is a key component of the DECKED truck bed system. It's constructed with weather-resistant materials, ensuring that your stored items are protected from rain, snow, and extreme temperatures. This feature is particularly beneficial for those who work in varying outdoor conditions.
By installing a DECKED system, you effectively double your truck bed's utility area. The upper deck is robust enough to carry additional cargo or equipment, while the drawers below provide organized, separate storage compartments. This maximization of space is ideal for both personal and professional use.
DECKED truck bed systems are renowned for their versatility and ability to cater to a wide range of needs and preferences. One of the key aspects of their design is the adaptability to different truck makes and models, ensuring a seamless fit and optimal functionality for each vehicle.
Each DECKED system is meticulously engineered to align with the specific dimensions and contours of various truck models. This customization means whether you drive a Ford F-150, a Chevy Silverado, a Dodge RAM, or another popular make, there's a DECKED system designed to fit your vehicle perfectly. The compatibility with different car makes and models is a significant advantage, as it ensures that the system integrates flawlessly with your truck, maintaining its aesthetic appeal and functionality.
The DECKED truck bed system is engineered to be both strong and durable. Generally, these systems can support a significant amount of weight on the upper deck. This capacity allows you to securely transport heavy items on top, while simultaneously storing equipment below. It's a robust solution for those who frequently carry heavy loads.
Specifically, the DECKED system can typically support up to 2,000 pounds of evenly distributed weight on the upper deck. This impressive load-bearing capacity is ideal for various heavy-duty applications, from hauling large tools and building materials to accommodating recreational gear like ATVs or heavy camping equipment.
Beneath the deck, the storage drawers provide additional space for organizing and securing tools and equipment. Despite the weight above, these drawers remain easily accessible, ensuring that your items are both secure and readily available when needed. This dual-functionality makes the DECKED system an exceptionally versatile solution for anyone who needs to carry substantial loads without sacrificing organization and accessibility.
In summary, integrating a DECKED truck bed system into your vehicle significantly enhances the way you use your truck. It brings a new level of organization, security, and efficiency, catering to both professional and personal needs.
With its substantial weight-bearing capacity, weather-resistant materials, and thoughtful design, the DECKED system caters to a wide range of needs. Whether you're a contractor, an outdoor enthusiast, or someone who enjoys a well-organized and functional vehicle, DECKED offers a solution that elevates the potential of your truck.
To discover the complete lineup of DECKED truck bed systems and to find a dealer near you, you're invited to visit Norstar Company and use their comprehensive Dealer Finder. Embrace this change and transform your truck into a vehicle that's more capable, versatile, and secure with the DECKED system, a true game-changer in truck bed storage solutions.
Transporting a truck bed may seem like a straightforward task, but it involves several key considerations to ensure it arrives at its destination safely and securely. Whether you're a DIY enthusiast or considering professional services, this guide will provide you with valuable insights on how to successfully transport a truck bed. We'll cover essential aspects from preparation to safety measures, ensuring a smooth journey for this crucial component of your truck.
What Are the Key Considerations Before Transporting a Truck Bed?
Before starting the task of transporting a truck bed, there are several critical considerations that should be taken into account. These considerations will not only help ensure the safe transport of the truck bed but also make the process smoother and more efficient.
Truck Bed Size and Weight
The size and weight of the truck bed are essential factors to consider. Measure the dimensions and weigh the bed to determine if it complies with transportation regulations and can be safely transported on your chosen method of transportation.
Destination
Knowing the destination is crucial. Consider the distance, terrain, and any potential obstacles you may encounter along the way. This information will help you plan the most suitable route and transportation method.
Transportation Method
Decide whether you will transport the truck bed as a standalone component or if it needs to be attached to a vehicle. The method you choose will impact the equipment and preparations required.
Legal and Regulatory Requirements
Familiarize yourself with the legal and regulatory requirements for transporting a truck bed. Depending on your location, you may need permits, and there may be weight limits and transportation regulations to adhere to.
Equipment and Tools
Ensure you have the necessary equipment and tools for securing the truck bed during transport. This may include tie-down straps, trailers, protective covers, and any additional materials required for stability and safety.
Preparation
Prepare the truck bed for transport by removing any accessories or components that could be damaged during transit. Secure loose parts, and if necessary, protect the bed's surface to prevent scratches or dents.
Route Planning
Plan your transportation route carefully, taking into consideration factors like road conditions, traffic, and any potential detours. A well-thought-out route can help you avoid unexpected challenges during transport.
Safety Measures
Prioritize safety measures for both the cargo and those involved in the transport. This includes proper securing of the truck bed, following speed limits, and observing safety protocols.
Can a Truck Bed be Transported as a Standalone Component?
Transporting a truck bed as a standalone component is a viable option, but it involves careful consideration of various factors. Firstly, the size and weight of the truck bed play a crucial role, with smaller and lighter beds being more suitable. Maintaining balanced weight distribution during transport is also essential, which is achieved by proper securing with straps and ties.
Additionally, having the appropriate equipment, complying with local regulations, and prioritizing safety measures are vital aspects. Route planning is crucial to avoid potential obstacles, and in some cases, seeking professional assistance may be advisable. Using protective measures like padding can help prevent damage during transport.
What Equipment Is Required for Transporting a Truck Bed?
Transporting a truck bed requires specific equipment to ensure a safe and efficient process.
Here are the key pieces of equipment needed:
Flatbed Trailer
A flatbed trailer is the primary equipment used for transporting a truck bed as a standalone component. It provides a stable and secure platform for the bed during transit.
Tie-Down Straps
High-quality tie-down straps are essential for securing the truck bed to the flatbed trailer. These straps should be strong and durable to withstand the weight and potential movement of the bed.
Chains and Binders
Chains and binders are additional securing tools that help keep the truck bed in place on the trailer. They provide extra stability and prevent shifting during transport.
Padding and Cushioning
To protect the truck bed from scratches and dents, using padding, blankets, or foam is recommended. These materials provide cushioning and reduce the risk of damage during transit.
Safety Flags and Reflectors
Depending on local regulations, safety flags and reflectors may be required to make the oversized load visible to other drivers on the road. They enhance safety during transport.
Safety Equipment
Personal protective equipment (PPE) such as gloves and safety glasses should be worn by individuals involved in loading, securing, and unloading the truck bed to ensure their safety.
Vehicle with Adequate Capacity
If you're using a vehicle to transport the bed, ensure that it has the capacity to safely carry the load. Check the vehicle's weight limits and towing capacity to prevent overloading.
Inspection Tools
Before and during transport, it's crucial to inspect all equipment, including straps, chains, and the trailer, to ensure they are in good working condition. Regular checks help maintain safety.
How Do You Safely Remove a Truck Bed for Transport?
Safely removing a truck bed for transport involves a series of steps to ensure the bed is detached securely and ready for transportation.
Here's a guide on how to do it:
1. Gather Necessary Tools and Equipment
Before starting, gather the tools and equipment you'll need, including a socket wrench or ratchet, socket set, and a helper to assist with the process.
2. Prepare the Truck
Park the truck on a level surface and engage the parking brake. Ensure the truck is turned off and the ignition key is removed for safety.
3. Disconnect Electrical Connections
Depending on your truck model, there may be electrical connections to the bed, such as tail lights or sensors. Carefully disconnect these connections to avoid damage during removal.
4. Remove Bolts and Fasteners
Locate and remove the bolts and fasteners securing the truck bed to the frame. Typically, there are several bolts along the bed's perimeter and possibly some in the center.
5. Lift the Truck Bed
With the help of your assistant, lift the truck bed using appropriate lifting equipment, such as a hoist or crane. Ensure the bed is raised evenly to maintain balance.
6. Place Supports
Once the bed is lifted, place support blocks or stands under it to keep it stable. This prevents it from tipping or falling during the removal process.
7. Lower the Truck Bed
Slowly lower the truck bed onto the supports, ensuring it rests securely. Double-check that all electrical connections are clear of any obstructions.
8. Secure the Truck Bed
Use straps or tie-downs to secure the truck bed to the lifting equipment or crane. This adds an extra layer of safety to prevent accidental movement during transport.
9. Inspect and Double-Check
Before transporting the bed, conduct a thorough inspection to ensure all connections are detached, and the bed is secure. Double-check the straps and supports to confirm stability.
10. Transport the Truck Bed
Once everything is in order, you can transport the truck bed to its destination using an appropriate vehicle or trailer.
Remember that the process of safely removing a truck bed may vary depending on the make and model of the truck. Always consult the manufacturer's guidelines and, if unsure, consider seeking professional assistance to ensure a secure and accident-free bed removal for transport.
Are There Legal and Regulatory Considerations for Transporting a Truck Bed?
There are indeed legal and regulatory considerations that must be taken into account when transporting a truck bed. Transporting oversized or heavy loads like truck beds is subject to various laws and regulations to ensure safety on the road.
Here are some key legal and regulatory considerations:
Permits
Depending on your location and the size of the truck bed, you may need special permits to transport oversized loads. These permits are typically issued by state or local transportation authorities and outline specific conditions and routes for transport.
Weight Limits
Most regions have weight limits for vehicles and loads. Exceeding these limits can result in fines or penalties. It's essential to calculate the total weight of the truck bed and ensure it complies with legal weight restrictions.
Dimensional Limits
In addition to weight limits, there are often restrictions on the dimensions of the load, including width, height, and length. Oversized truck beds may require special allowances or routes to transport legally.
Escort Vehicles
Some jurisdictions may require escort vehicles for oversized loads. These vehicles help guide and alert other drivers to the presence of a large load on the road.
Safety Markings
Proper safety markings and flags may be required on oversized loads to enhance visibility and safety. This includes the use of warning flags, reflective tape, and appropriate signage.
Travel Restrictions
Certain routes, bridges, and tunnels may have restrictions on the passage of oversized loads due to clearance heights and weight limits. It's essential to plan your route carefully to avoid such obstacles.
Time Restrictions
Some areas may impose time restrictions on the transportation of oversized loads. For example, travel may be limited to specific hours of the day or days of the week.
Safety Regulations
It's crucial to adhere to safety regulations when transporting a truck bed. This includes securing the load properly with high-quality straps, chains, and tie-downs to prevent accidents or cargo shifts during transit.
Insurance Requirements
Ensure that your cargo insurance coverage is sufficient to protect against potential damage or loss during transport. Verify if additional coverage is necessary for oversized loads.
Documentation
Keep all necessary documentation readily available, including permits, licenses, and proof of insurance. Failure to provide the required paperwork can lead to legal issues.
Local Variations
Regulations can vary from one jurisdiction to another, so it's crucial to research and comply with the specific requirements of the areas through which you plan to transport the truck bed.
How Should a Truck Bed be Secured for Transportation?
Securing a truck bed for transportation is crucial to ensure it arrives safely and without any damage.
Here's what you need to do:
These simple steps will help you secure the truck bed effectively for a smooth transport.
What Safety Measures Should Be Observed During Transport?
Ensuring a safe and smooth journey when transporting a truck bed isn't just about following rules. It's also a commitment to keeping everyone on the road secure and the cargo intact.
Here are some practical safety tips to make your truck bed transport both secure and engaging:
1. Strap it Securely
Start by using strong tie-down straps to secure the truck bed. This keeps it in place during transport.
2. Balance the Weight
Make sure the weight is evenly spread on the trailer or vehicle to avoid wobbling.
3. Check the Weather
Keep an eye on the weather forecast. Rain, wind, or snow can affect the transport, so plan accordingly.
4. Legal Requirements
Check local regulations for any permits or restrictions related to transporting oversized loads like truck beds. Compliance is essential to avoid legal issues.
5. Regular Inspections
Before hitting the road, inspect the straps, ties, and restraints. They should be tight and secure to prevent any movement during transport.
6. Route Planning
Plan your route carefully, considering factors like road conditions, clearances, and weight limits. Avoid tight turns and low clearances.
7. Professional Help
If you're unsure about handling the transport, consider professional assistance. Experienced transport companies have the right equipment and know-how.
8. Protective Measures
To prevent damage to the truck bed, use padding, blankets, or foam as cushioning. This safeguards against scratches or dents.
Can Professional Services Assist in Transporting a Truck Bed?
Absolutely! Turning to professionals for truck bed transportation is a smart move. These experts are seasoned in handling oversized loads, equipped with the right tools, and well-versed in the legalities. By teaming up with them, you can rest easy knowing your truck bed will reach its destination safely and efficiently. It's like having a skilled captain steering your cargo towards a smooth journey, allowing you to focus on other aspects of your project with confidence.
What Precautions Should Be Taken to Protect the Truck Bed During Transport?
To safeguard your precious truck bed during transport, a few precautions can make a world of difference.
1. Use Protective Materials
Consider using padding, blankets, or foam to cushion your truck bed. These materials act as a shield, preventing scratches or dents caused by bumps and vibrations during transit.
2. Secure Load Properly
Ensure your truck bed is securely fastened to the transporting vehicle or trailer. Use reliable straps, chains, or tie-downs to keep it in place. Regularly inspect these restraints to confirm they remain tight throughout the journey.
3. Choose the Right Route
Plan your route carefully to avoid tight turns, low clearances, or rough terrains that could put your truck bed at risk. A well-thought-out route minimizes potential obstacles and keeps your cargo safe.
Can a DIY Enthusiast Successfully Transport a Truck Bed, or Should Professionals Be Involved?
Transporting a truck bed can be a demanding task, and whether a DIY enthusiast can handle it depends on various factors. Smaller and lighter truck beds may be manageable for DIY transport, but larger or heavier beds may require professional assistance. Factors like balanced weight distribution, proper equipment, compliance with local regulations, and safety precautions must be considered. Professionals have the expertise and equipment to handle oversized loads safely and efficiently. They can navigate legal requirements more effectively, making it a wise choice for complex transport. However, DIY enthusiasts can transport smaller beds with proper planning, equipment, and adherence to safety guidelines.
Your Road to Safe Truck Bed Transport
When it comes to trucking and how to transport a pickup truck bed, safety should never be taken for granted. The need to secure cargo transport is real and important, whether you're a hands-on DIY enthusiast or prefer the expertise of professionals.
For DIYers, it's possible to transport smaller and lighter truck beds successfully. Just remember to plan meticulously, use the right equipment, and follow safety measures diligently. However, when dealing with larger or more complex loads, turning to professionals is a smart choice. Transport companies bring their wealth of experience, specialized equipment, and a deep understanding of legal requirements to ensure your cargo's safety.
For all your truck bed needs, check out Norstar Company. Discover their network of authorized dealers nearby to find the perfect truck bed solution. Whether you opt for a DIY approach or seek professional help, always prioritize safety, comply with regulations, and safeguard your truck bed. With the right approach, your truck bed will reach its destination in top condition, and Norstar will be there to support you every step of the way.
Installing a trailer hitch is a practical skill that enhances your vehicle's utility, allowing you to haul everything from boats and RVs to cargo trailers. Whether you're planning a camping trip or need to move heavy equipment, a reliable trailer hitch is essential. This guide will walk you through the process, from selecting the right hitch to the final checks.
A trailer hitch is a device attached to the chassis of a vehicle for towing. It's crucial for anyone looking to transport additional cargo or tow a trailer, boat, or recreational vehicle. The right hitch not only expands your vehicle's capabilities but also ensures safety on the road.
Why might you need one? The reasons are as varied as the loads you might want to haul. For adventurers, a trailer hitch allows for the easy towing of camping trailers or boat trailers, making weekend getaways more enjoyable. For homeowners, it facilitates the transport of garden supplies, furniture, or waste to the dump. Commercially, it's indispensable for businesses that require the transportation of goods, equipment, or machinery.
Getting your trailer hitch installed right is important, mainly because it keeps you and everyone else on the road safe. If it's not hooked up properly, there's a chance your trailer could come loose and cause a major accident. A good install protects your vehicle as well. Mess it up, and you might damage your car or the hitch, leading to some expensive fixes. So, it's all about making sure things stay secure and your vehicle stays in good shape.
Before you dive into installing a trailer hitch, it's essential to have all the right tools and materials at hand. This preparation not only makes the installation process smoother but also ensures that everything is done safely and correctly. A complete set of tools not only aids in a hassle-free installation but also helps in tackling any unexpected challenges that may arise during the process.
Some of the tools and materials needed to install a trailer hitch include:
Whether you’re a seasoned DIY enthusiast or a first-timer, following a step-by-step guide can help you achieve a secure installation.
Start by making sure you have all the required tools and materials listed in the previous section. Having everything within reach will streamline the installation process and reduce the need to stop midway through to find missing items.
Ensure your vehicle is parked on a flat, stable surface and engage the parking brake. Use the jack to lift the vehicle slightly, then place the jack stands at secure lifting points under the vehicle to support it safely while you work.
Carefully align the hitch under your vehicle according to the instructions. It's crucial to line up the hitch with the pre-existing holes or mounting points on your vehicle's frame.
Hand-thread the bolts through the hitch and into your vehicle’s frame to secure it in place. Once all bolts are hand-tight, use a wrench and socket set to tighten them. Avoid fully tightening at this stage to allow some adjustment.
If your hitch has safety chain attachments, connect them now. Ensure the chains are easily accessible and do not drag on the ground when in use.
For hitches used to tow trailers requiring brake lights and turn signals, attach the wiring harness following the manufacturer’s guidelines. Secure the wiring to prevent it from hanging or dragging.
Fit any accessories such as ball mounts, bike racks, or cargo carriers to check for proper fit. Make adjustments as needed to ensure compatibility and security.
Go back to each bolt and use a torque wrench to tighten them to the specifications provided by the hitch manufacturer. This ensures that the hitch is securely attached to your vehicle's frame.
Carefully remove the jack stands and lower your vehicle. Conduct a visual inspection to ensure the hitch is securely in place and there is no interference with the vehicle's undercarriage or exhaust. Finally, attach a trailer or accessory and perform a test drive to ensure everything is working as it should, paying close attention to the hitch’s performance under load.
The cost of installing a trailer hitch can vary widely based on several factors, including the type of hitch, the make and model of your vehicle, and whether you choose to install it yourself or have it professionally installed. On average, the price for a professional hitch installation can range from $100 to $800. This range accounts for the hitch itself, which can cost between $50 to $250, and the labor, which can vary greatly depending on the complexity of the installation and the rates charged by the service provider.
DIY installations can significantly reduce costs, primarily to the price of the hitch and any tools or accessories you may need to purchase. However, this option requires a certain level of mechanical skill and confidence. For those who choose the professional route, it's worth noting that some retailers offer package deals that include the hitch and installation at a discounted rate, making it a potentially more cost-effective and convenient option.
Generally, a professional installation might take between 30 minutes to 2 hours. This timeframe assumes the vehicle is prepared for installation without any modifications needed.
For DIY enthusiasts, the process might take a bit longer, especially if it's your first time. You can expect it to take anywhere from an hour to several hours. The variance is due to familiarizing yourself with the instructions, ensuring you have the correct tools, and possibly needing to make minor adjustments to ensure a perfect fit.
Maintaining and caring for your trailer hitch after installation is essential to ensure its longevity and functionality. Proper maintenance not only prevents wear and tear but also ensures that your hitch remains safe and reliable for towing.
From regular inspections to following manufacturer guidelines, each step in the maintenance process plays a crucial role in keeping your hitch in top condition.
Inspect your hitch regularly for any signs of rust, corrosion, or damage. Check all components, including the hitch ball, mounting system, and electrical connections, for wear or deterioration.
Keep your hitch clean from dirt, grime, and road salt, which can contribute to rust and corrosion. Use a mild soap and water solution and avoid abrasive cleaners that can damage the finish.
Apply a thin layer of grease to the hitch ball and moving parts to reduce friction and prevent rust. Ensure the locking mechanisms are also lubricated to keep them operating smoothly.
Check the bolts and nuts periodically to ensure they are tight and secure. Vibration from towing can loosen these fasteners over time, potentially leading to a hazardous situation.
Inspect all parts of your hitch system and replace any that show signs of excessive wear or damage. This includes the hitch ball, pins, and electrical components if applicable.
Use hitch covers to protect the hitch ball and receiver when not in use. This can prevent rust and keep the hitch clean, reducing the need for frequent cleaning.
Adhere strictly to the weight limits specified by the hitch manufacturer. Overloading your hitch can cause damage and put you at risk while towing.
If your hitch is detachable, store it in a dry, covered area when not in use to protect it from the elements and reduce the risk of rust and corrosion.
Always refer to the manufacturer's maintenance and care guidelines. They provide specific recommendations tailored to your hitch model to ensure optimal performance.
Consider having your hitch system professionally inspected annually, especially if you tow frequently or under challenging conditions. A professional can identify potential issues that may not be obvious to the average user.
Let's explore some of the most frequently asked questions about trailer hitch installation.
Yes, many vehicle owners can install a trailer hitch by themselves, especially if they have basic mechanical skills and the right tools. Most hitch manufacturers provide detailed instructions and necessary hardware for installation. However, the ease of installation can vary depending on the vehicle model and the type of hitch. Some vehicles may require minor modifications or special tools.
The difficulty of installing a trailer hitch varies widely. For some vehicles, it's a straightforward process requiring no drilling and just basic hand tools. For others, the installation might be more complex, requiring drilling, cutting, or even temporary removal of parts like the bumper. The key to a smooth installation process is thoroughly reading and understanding the instructions before starting and ensuring you have all the necessary tools and equipment.
Absolutely. Installing a trailer hitch significantly increases your vehicle's versatility and capability. It allows you to tow trailers, boats, or campers, and it can also be used to mount a bike rack or cargo carrier, expanding your vehicle's carrying capacity. Whether for recreational use, home improvement projects, or expanding business capabilities, a trailer hitch is a valuable addition to any vehicle, offering both convenience and utility.
Adding a hitch to your vehicle opens up a world of possibilities, from towing trailers and boats to enhancing storage with bike racks and cargo carriers. The key to a successful installation and maintenance lies in following the right steps, using the appropriate tools, and understanding the importance of regular upkeep.
At Norstar, we're not just about providing top-quality trailer hitches. We're also here to ensure you have the best possible experience with your towing needs. Our products are designed to meet the rigorous demands of towing, ensuring you can haul confidently, whether for work or play. We also offer Trailer Financing and Loans. This option is designed to make it easier for you to acquire the necessary equipment without financial strain, ensuring you can get on the road safely and efficiently.
Visit Norstar Truckbeds & Iron Bull Trailers today for more information on our products, financing options, or advice on choosing the right hitch for your vehicle.
In the dynamic realms of construction and landscaping, efficiency and versatility are crucial. Every project demands reliable equipment that not only streamlines operations but also enhances productivity. One indispensable asset in these industries is the dump trailer. Let’s delve into the myriad of benefits that dump trailers bring to construction and landscape businesses, showcasing how these versatile workhorses are transforming the way projects are tackled. Norstar Company is known for its commitment to quality, innovation, and exceptional customer service. They have produced high-quality dump trailers for over a decade, focusing on durability, versatility, and value.
Dump trailers excel in their primary function – efficiently transporting and unloading materials. Whether it’s gravel, soil, debris, or equipment, the hydraulic lift system of dump trailers simplifies the unloading process. This efficiency translates into time savings, allowing your team to focus on the core aspects of construction or landscaping.
The beauty of dump trailers lies in their versatility. They are not limited to a single task. Need to haul equipment to a job site? Check. Transport bulk materials? Check. Clear debris swiftly? Check. The adaptability of dump trailers makes them an invaluable asset for various tasks within construction and landscaping projects.
Time is money in the construction and landscaping business. Dump trailers contribute to significant time savings by expediting the loading and unloading processes. Additionally, the reduced need for manual labor during these tasks translates into cost savings, contributing to the overall profitability of your projects.
Dump trailers come equipped with safety features that make them user-friendly and secure. The hydraulic lift system allows for controlled and stable unloading, minimizing the risk of accidents during the process. The convenience of dumping materials at the desired location with precision enhances on-site safety for your team.
Dump trailers are designed to handle substantial payloads, allowing for efficient transport of large quantities of materials in a single trip. This increased capacity not only boosts productivity but also reduces fuel costs and the wear and tear on your hauling vehicles.
Construction and landscaping projects often involve navigating challenging terrains. Dump trailers are built with robust suspensions and durable tires, enabling them to traverse uneven surfaces with ease. This adaptability ensures that your materials and equipment reach the job site intact, regardless of the conditions.
In the fast-paced worlds of construction and landscaping, having the right tools can make all the difference. Dump trailers are a powerhouse, offering unparalleled efficiency, versatility, and safety. Investing in these robust workhorses can significantly elevate your business, making each project more streamlined, cost-effective, and ultimately, more successful. Embrace the benefits of dump trailers and witness the positive impact they bring to your construction or landscape enterprise.
If you are looking for a company who makes the best dump trailers, Norstar Company is a great choice. With a focus on producing high-quality, reliable dump trailers that can handle any load, Norstar has established itself as one of the top manufacturers in the industry. From the quality of their materials to the precision of their engineering, Norstar’s dump trailers are built to last and provide exceptional value for their customers. Furthermore, Norstar’s commitment to customer satisfaction and support is unparalleled. With a knowledgeable and friendly customer service team, we are dedicated to helping you find the right dump trailer for your needs and ensuring you are delighted with your purchase.
Moving heavy equipment is no small feat. It's a process that demands attention to detail, respect for safety, and a deep understanding of logistics. Whether you're relocating machinery for construction, agriculture, or any other industry, this guide provides the knowledge you need to transport your equipment safely and efficiently.
Proper heavy equipment hauling is essential primarily for safety reasons. When heavy machinery is not secured correctly, it poses a significant risk to everyone on the road. Imagine a piece of heavy machinery shifting or falling off a trailer while in transit. It could lead to serious accidents, endangering lives and causing property damage.
Beyond safety, there's also the matter of legal compliance. Transporting heavy equipment without adhering to regulations can result in hefty fines and legal issues, disrupting operations and affecting your bottom line. In essence, doing it right saves lives, avoids legal troubles, and keeps your project on schedule and within budget.
Transporting heavy machinery requires careful planning and execution.
Here are foundational tips to get you started:
Understanding the size and weight of your equipment is the first step in planning its transport. This information helps in selecting the right trailer and knowing if you need special permits for oversized loads.
Different regions have different rules about transporting large or heavy loads. Identifying the need for permits early in the planning process helps avoid delays and ensures your transport is legal.
The right trailer is essential for safe and efficient transport. It must not only support the weight of your equipment but also accommodate its dimensions securely.
Before you load your equipment, give your trailer a thorough inspection. Check for potential issues that could affect safety, such as tire wear or brake problems.
Loading your equipment safely and securing it properly are critical to preventing damage during transport. Use appropriate straps, chains, and other securing devices to keep everything in place.
Choosing the right trailer for heavy equipment transport or heavy equipment haulers is a critical decision that can significantly impact the efficiency and safety of your heavy hauling trucking operation. Different trailers offer unique benefits and come with specific challenges, making it important to understand their pros and cons. This knowledge ensures you select the best option for your specific needs, whether you're moving construction machinery, agricultural equipment, or other heavy loads through heavy equipment transportation.
Trailers with a low deck height are favored for transporting heavy equipment because they lower the overall center of gravity, reducing the risk of tipping during transit. This feature is particularly beneficial when navigating uneven roads or tight turns. However, the main drawback is their limited suitability for extremely heavy loads, as the low clearance can restrict their ability to handle weighty machinery without risking undercarriage damage. This scenario highlights the importance of checking heavy equipment specs when planning your heavy equipment transport system.
When comparing hydraulic and mechanical trailers, the key advantage of hydraulic models lies in their adjustable height, which simplifies the loading and unloading process, especially for heavy machinery transport that cannot be easily lifted. This convenience, though, comes at a higher cost, both in terms of initial investment and maintenance. Mechanical trailers, on the other hand, are more cost-effective and offer durability with less complex maintenance needs. However, they typically require additional equipment, such as ramps, to load and unload machinery, which can add time and labor to the process.
Sliding axle trailers offer a versatile solution for hauling various types of equipment. Their design allows for an adjustable axle position, facilitating a more balanced load distribution and accommodating different equipment sizes and weights. This flexibility makes them a great all-rounder for heavy hauling trucking. However, they do require a larger area for loading and unloading, which might not be available in constrained spaces or busy job sites. Additionally, the mechanism that allows the axle to slide can add complexity and maintenance requirements to the trailer's operation.
Incorporating a beavertail into your trailer design can significantly enhance its functionality for heavy equipment transportation. A beavertail is a sloped extension at the rear of the trailer, designed to make loading wheeled or tracked machinery easier by eliminating the need for separate ramps. This design feature speeds up the loading process and improves safety by providing a more stable platform. The downside is that it may slightly reduce the overall load capacity of the trailer due to the space the beavertail occupies and can add to the trailer's weight, potentially affecting fuel efficiency.
Ensuring the safe and efficient transport of heavy equipment requires adherence to a set of best practices at each stage of the process. From the initial preparation before loading, through the careful execution of loading, to the final checks after securing your equipment, every step is crucial. These practices not only guarantee the safety of the transport team and the public but also protect the machinery from damage and ensure compliance with legal requirements.
Preparation is key to successful heavy equipment transport. Begin by thoroughly inspecting the equipment, checking for any loose parts or leaks that could pose a risk during transport. It's also important to clean the machinery, as dirt and debris can obscure safety features or inspection points.
Documenting the equipment's condition with photos can provide a helpful reference in case of disputes or for insurance purposes. Ensure that the equipment is in a safe, operational state before it's loaded onto the trailer, with all moving parts securely fastened or locked in place.
The loading process is a critical moment where safety must be the top priority. Always use a spotter or guide to assist the driver in positioning the equipment onto the trailer, ensuring clear communication throughout the process to prevent accidents.
It's vital to follow the manufacturer's guidance for securing points and weight distribution to avoid overloading one side of the trailer. The equipment should be loaded in a way that maintains the trailer's balance and adheres to axle weight limits, minimizing the risk of tipping or loss of control during transport.
Once the equipment is in place, conducting a thorough check is essential to ensure everything is correctly secured. Use chains, straps, and other securing devices as recommended for the type of equipment being hauled, checking that they are tensioned properly and free from damage.
Confirm that all safety signals, such as lights and flags, are visible and in working order, especially for oversized loads. Finally, perform a walk-around inspection of the trailer and load, verifying that the equipment remains stable and secure. This final check is crucial for road safety and legal compliance, helping to prevent shifts during transport that could lead to accidents or damage.
When it comes to tying down heavy equipment for transport, getting it right is non-negotiable. These extra steps are essential in keeping the road safe for everyone. Each piece of equipment has its unique needs for securing, depending on its weight, shape, and size. Here's a straightforward look at what's needed to make sure everything arrives just as it should – safe and sound:
It's simple: make sure you're using the right gear to tie down your equipment and use plenty of it. This means selecting straps, chains, and binders that are strong enough to withstand the forces that the load might encounter during transport, such as acceleration, braking, and turns.
The capacity of these devices should match or exceed the weight of the equipment being secured. It's also important to use enough tie-downs to distribute the force evenly and prevent any movement of the load.
For the safety of the load and the equipment, it's vital to attach securing devices to the correct points on the machinery. Manufacturers often specify attachment points designed to hold the equipment securely without causing damage. Using these designated spots means your equipment stays put, and you won't find yourself with damaged goods before you even hit the road.
Every moving part of your equipment needs to be locked down tight. If it can swing, slide, or fold, it needs to be secured. This includes any parts that can move, extend, or pivot, such as arms, booms, and blades. Locking these components in place prevents them from moving during transport, which would unbalance the load or cause damage. Sometimes, this means adding extra straps or chains, but it's worth it to keep everything in place.
Last but definitely not least, the driver needs to see. While securing the load is crucial, it's equally important to ensure that the driver's visibility is not compromised by the equipment or the securing devices. Adjust how things are loaded or use extra mirrors to cover all angles. A clear view means a safe trip, so this step is as important as the rest.
Transporting heavy equipment safely and efficiently boils down to choosing the right tools for the job and following best practices to the letter. Norstar Truck Beds and Iron Bull Trailers stand out in the industry for their reliability, durability, and the variety of options they offer to meet every hauling need. Whether you're moving construction machinery, agricultural equipment, or anything in between, we have the right solution for you.
Our goal is to support your operations by providing not just top-tier hauling solutions but also flexible financing options to help you grow. That’s why we also offer tailored Trailer Financing and Loans. This ensures that businesses of all sizes can access the quality trailers they need without financial strain.
Visit our website today and explore our range of Norstar Truck Beds and Iron Bull Trailers at Norstar Company.
Learning proper towing techniques is critical for both the safety of the driver and the condition of the towed vehicle or trailer.
Understanding these techniques prevents accidents, minimizes damage, and maximizes efficiency.
Gaining knowledge about the necessary skills, such as correct rigging, weight distribution, and driving adjustments can enhance your capability to handle various towing situations.
When it comes to what do you need to tow a trailer, the right equipment is as essential as the techniques. For a safe and effective towing, it's necessary to understand the capability of your equipment, and scenario-specific choices such as towing hitch types, safety chains, and more.
Towing capacity is the maximum weight that your vehicle can tow. It's determined by the vehicle manufacturer and must be strictly adhered to avoid damage to your vehicle or a catastrophic failure on the road.
This weight includes the trailer and its cargo, so careful calculation is needed when loading a trailer for towing.

The hitch type you need depends on the weight of the load and the vehicle's towing capacity. The five main hitch types are Class I (for lighter loads), Class II, Class III, Class IV and Class V (for heavier loads).
Each has a different towing capacity and is suitable for different types of vehicles and trailers.
Hitch size and load ratings are related to the type of hitch that you have installed.
The hitch size should be compatible with the trailer's hitch receiver for a secure fit. Load rating, on the other hand, defines the maximum weight that can be safely towed and shouldn't be exceeded.
Beyond the primary tools like hitches and receivers, there are also key accessories required to ensure a safe towing experience. Accessories can include tow bars, safety chains, receiver locks, and brake controllers, each contributing to a safer, more efficient towing operation.
Before you even start your journey, it's essential that your trailer is correctly and safely hitched to your vehicle. Here are step-by-step instructions as well as pre and post-hitching safety checks.
Here are some things to check on before and after hitching on how do you tow a trailer:
Pre-Hitching:
Post-Hitching:
Knowing your vehicle's towing limit is critical to avoid dangerous situations or potential damage to your vehicle. Here's how to find it:
Knowing your vehicle is well-maintained and properly prepared for towing can make the journey safer and smoother. Here are some key aspects to consider:
Towing a trailer is substantially different from regular driving. It requires enhanced attention to acceleration, turning, braking, and space management. Here are some techniques that will help you have a safer towing experience:
Even with careful preparation, issues can arise. Knowing how to handle them can prevent accidents and breakdowns.
Trailer sway is a common problem that can be intensified by high winds, high speeds, or sudden movements. If you experience sway:
If the trailer comes unhooked while driving:
If you notice diminished response from the trailer brakes:
Towing a trailer doesn’t need to be a daunting task. With the right preparation, knowledge, and skills, you can tow safely and confidently. Remember that the key to a stress-free towing experience lies in proper vehicle and trailer maintenance, understanding and adhering to towing capacities, and mastering safe towing techniques on the road.
Norstar Trailers has several locations and each location is committed to providing high-quality trailers and services, ensuring you have the right equipment for safe and effective towing. Whether you're picking up a new trailer or seeking advice, Norstar's experienced team is there to support you every step of the way.
GVWR (Gross Vehicle Weight Rating) and GAWR (Gross Axle Weight Rating) are terms used in the transportation industry to indicate weight limits for vehicles/trailers and their individual axles.
GVWR (Gross Vehicle Weight Rating):
• Definition: GVWR is the maximum weight a fully loaded trailer is rated to safely carry, including its own weight and the weight of passengers and cargo.
• Components: GVWR encompasses the entire trailer, including the chassis, body, engine, fuel, fluids, passengers, and cargo.
• Purpose: GVWR is crucial for ensuring that a trailer does not exceed its design capacity, promoting safety and preventing structural damage, brake failure, or other issues related to overloading.
GAWR (Gross Axle Weight Rating):
• Definition: GAWR is the maximum weight that an individual axle is rated to safely support.
• Components: GAWR considers the weight supported by each axle, including the weight of the tires, wheels, brakes, and any part of the trailer’s body or chassis directly supported by that axle.
• Purpose: GAWR is essential for preventing overloading on specific axles, which could lead to axle or suspension system failure, reduced braking efficiency, and other safety concerns.
Difference:
• The main difference between GVWR and GAWR is in their scope:
• GVWR applies to the entire trailer and represents the maximum weight the trailer can safely handle.
• GAWR focuses on individual axles and specifies the maximum weight each axle can support without compromising safety and performance.
Both GVWR and GAWR are crucial specifications for trailer owners and operators to understand, as exceeding these weight ratings can have serious safety implications and may result in fines or other legal consequences. Manufacturers determine these ratings based on extensive testing and engineering considerations to ensure the safe operation of the trailer under various conditions.
Knowing the Gross Vehicle Weight Rating (GVWR) is crucial for several reasons, all of which revolve around ensuring safety, compliance with regulations, and the proper functioning of a trailer. Here are key reasons why knowing GVWR is important:
• Safety: GVWR is a safety standard designed to prevent overloading, which can lead to various issues such as brake failure, suspension problems, tire blowouts, and compromised handling. Operating a trailer beyond its GVWR can significantly increase the risk of accidents and jeopardize the safety of passengers and other road users.
• Legal Compliance: Many regions have regulations that restrict the maximum weight a trailer can carry. Knowing and adhering to the GVWR is essential for legal compliance. Overloaded vehicles can incur fines and penalties, and drivers may be subject to legal consequences.
• Equipment Longevity: Exceeding the GVWR puts additional stress on various components of the trailer, including the suspension system, brakes, tires, and transmission. Over time, this can lead to accelerated wear and tear, reducing the lifespan of critical components and increasing maintenance costs.
• Manufacturer’s Warranty: Operating a trailer beyond its GVWR may void the manufacturer’s warranty. Warranty coverage is typically based on the assumption that the trailer is used within specified weight limits and under normal operating conditions. Exceeding these limits may result in warranty claims being denied.
• Fuel Efficiency: Overloaded trailers generally have reduced fuel efficiency. Knowing and adhering to the GVWR can help optimize fuel consumption and reduce operational costs.
• Insurance Implications: Operating a trailer beyond its GVWR may affect insurance coverage. In the event of an accident, insurance companies may investigate and potentially deny a claim if the trailer was overloaded, as it represents a violation of safety and legal standards.
• Road Infrastructure Protection: Overloaded trailers can cause damage to roads and bridges. Adhering to the GVWR helps protect the infrastructure and minimizes the public cost of road maintenance.
Understanding and adhering to the GVWR is crucial for promoting safety, legal compliance, and the efficient operation of a trailer. It is a key responsibility for drivers, fleet operators, and anyone involved in the transportation of goods and passengers.
Traveling with a trailer in tow means you're not just responsible for the safety of your vehicle, but also for the security of your cargo and the safety of others on the road. One of the most critical components ensuring this safety is your trailer's braking system. Over time, brakes wear down, lose effectiveness, and require replacement to maintain optimal performance. Whether you're an experienced DIY enthusiast or a first-timer ready to tackle maintenance tasks, understanding how to change trailer brakes is essential.
This comprehensive guide will walk you through every step of the process, from identifying the type of brakes your trailer uses to the tools you'll need and a step-by-step walkthrough of the replacement process. By the end, you'll be equipped with the knowledge to ensure your trailer brakes are in top condition, keeping your journeys smooth and safe.
Importance of Proper Trailer Brake Maintenance
Keeping your trailer brakes in top shape is crucial not just for your safety, but for everyone else on the road too. Well-maintained brakes mean you can stop reliably and safely, no matter the load you're hauling. Besides avoiding accidents, this also means dodging costly repairs down the line. Ignoring your brake maintenance can lead to bigger, more expensive problems, and nobody wants that.
Plus, staying on top of your brake condition keeps you on the right side of the law, as many places have strict rules about vehicle safety. In short, regular brake checks save you money, keep you legal, and, most importantly, keep you safe.
Types of Trailer Brakes
Knowing what type you've got on your trailer is key because it affects how you'll maintain them and how well they'll do their job of keeping you safe on the road. Here's a brief overview:
Drum Brakes
A traditional choice for many trailers, drum brakes work by pushing brake shoes against a spinning drum attached to the wheel. This friction slows the trailer down. They're known for their durability and cost-effectiveness but may require more frequent adjustments and maintenance to perform optimally.
Disc Brakes
These brakes function by pressing brake pads against a disc (or rotor), which is connected to the wheel, to create friction and slow the trailer. Disc brakes are praised for their superior stopping power and efficiency, especially under heavy loads or in wet conditions. They tend to have better heat dissipation, reducing the risk of brake fade during prolonged use.
Electric Brakes
Electric trailer brakes are activated by a brake controller from the towing vehicle, allowing for adjustable braking strength. This system is straightforward to install and use, offering good control over the braking process. Electric brakes are especially suitable for larger trailers, providing consistent performance and ease of integration with the tow vehicle's braking system.
Tools and Materials Needed
When it's time to replace your trailer brakes, having the right tools and materials on hand is crucial. Here’s a rundown of what you'll need to get the job done properly and safely:
1. Jack and Jack Stands
You'll need these to lift and securely support your trailer. Make sure they're rated for the weight of your trailer to ensure safety while you're working underneath.
2. Lug Wrench or Impact Wrench
These are necessary for removing the wheels to access the brakes. An impact wrench can make the job quicker, but a sturdy lug wrench will also do the trick.
3. Socket Set
A comprehensive socket set is essential for removing and securing various nuts and bolts throughout the brake replacement process.
4. Brake Cleaner
This helps clean the brake assembly and surrounding area, removing grease and grime for a cleaner work environment and better brake performance.
5. New Brake Parts
Depending on the type of brakes you're working with (drum, disc, or electric), you'll need new brake shoes or pads, and possibly new drums or rotors. Make sure you have the correct parts for your specific trailer model.
6. Adjustable Wrench and Pliers
These tools are handy for adjusting components and handling parts that may be difficult to maneuver with sockets alone.
7. Torque Wrench
Essential for tightening bolts to the manufacturer's specified torque, ensuring everything is secure and safe for operation.
8. Rubber Mallet
Brake components can be a bit stubborn sometimes. A rubber mallet can help loosen parts without damaging them.
9. Safety Glasses and Gloves
Always protect your eyes and hands from dirt, debris, and chemicals during the process.
10. Brake Adjustment Tool (for drum brakes)
If you're working with drum brakes, this specialized tool helps adjust the tension on the brake shoes.
Performing a Brake Controller Inspection
The brake controller is a big deal when it comes to towing safely, making sure your trailer stops when you do, smoothly and safely. So, how do you make sure this essential piece of your towing setup is always ready for action? Let's walk through checking your brake controller, ensuring every journey is as safe as the last.
1. Visual Inspection
Start with a basic visual check. Look for any obvious signs of wear or damage to the controller itself, the wiring, and connections. Make sure everything is securely mounted and that there are no loose or frayed wires.
2. Power Check
Next, verify that the brake controller is receiving power. Most controllers have an LED light or display that illuminates when connected properly. If there's no sign of power, check your vehicle's fuse box for a blown fuse or bad connection.
3. Adjustment Settings
Review the settings on your brake controller. Different loads and driving conditions may require adjustments to ensure optimal braking performance. Refer to the manufacturer's guidelines for setting adjustments based on your specific towing situation.
4. Test the Controller
The best way to test the brake controller is with a test drive. Find a safe, traffic-free area to perform this test. As you drive, apply the brakes to see how the trailer responds. The trailer should slow down smoothly without jerking. If the braking feels too aggressive or too weak, adjust the controller settings accordingly.
5. Check for Responsiveness
During the test drive, also pay attention to how responsive the brakes are. There should be no delay from the moment you apply the brakes in the towing vehicle to when the trailer begins to slow down. Any lag could indicate a problem with the controller or its connection to the trailer.
Why is an inspection important?
A properly functioning brake controller is essential for safe towing. It ensures that your trailer brakes at the same time and with the same intensity as your towing vehicle, preventing dangerous situations like jackknifing or losing control. Regular inspections and adjustments to your brake controller can significantly improve your towing experience, making it safer for you, your cargo, and others on the road.
How to Replace Trailer Brakes: Step-By-Step Guide
Tackling the job of replacing your trailer brakes might seem daunting, but with the right tools and a bit of know-how, it's a task you can take on to ensure your trailer remains a safe and reliable companion on the road. Here's a straightforward, step-by-step guide to walk you through the process, making sure you get it right from start to finish.
Step 1: Lift and Secure the Trailer
First things first, you need to safely lift the trailer high enough so that the wheels are off the ground. Use a reliable jack for lifting and then place jack stands under the trailer frame to keep it securely elevated throughout the process. Safety is key, so double-check that everything is stable before moving on.
Step 2: Remove the Wheels
With the trailer securely lifted, remove the wheels to access the brakes. Use a lug wrench or an impact wrench to loosen and remove the lug nuts, then pull the wheels off. Keep the lug nuts in a safe place so you don't lose them.
Step 3: Expose the Inner Brake Drum
Now, you'll need to remove the hubcap (if present) and any other components blocking access to the brake drum. This might include cotter pins and retaining nuts. Once these are removed, you can pull the drum off, exposing the brake components inside.
Step 4: Inspect the Brake Drum Assembly
Before you proceed with replacing anything, take a moment to inspect the brake drum assembly. Look for signs of wear, such as deep grooves or scoring on the drum surface. This is a good time to decide whether the drum needs replacing or if it can be resurfaced.
Step 5: Remove and Replace Brake Components
Carefully remove the old brake shoes (or pads, if you're working with disc brakes), springs, and any other worn components. Compare the old parts with the new ones to ensure a correct match, then install the new components, making sure everything is positioned correctly and securely.
Step 6: Reassemble and Adjust Brakes
Once the new brake components are in place, reattach the brake drum or disc. Then, adjust the brakes according to the manufacturer's instructions. For drum brakes, this usually means adjusting the tension so the brake shoes are close to the drum but not dragging.
Step 7: Test the New Brakes
After reassembling everything, it's crucial to test the new brakes to ensure they're working correctly. Lower the trailer and reattach the wheels. Tighten the lug nuts securely. Then, take the trailer for a slow test drive in a safe area, applying the brakes to check for proper function. Listen for any unusual noises and feel for any vibrations that could indicate a problem.
Replacing your trailer brakes is a hands-on way to maintain your trailer's safety and performance. While it might take a bit of effort, the peace of mind knowing you've done the job right is well worth it. Remember, if you're ever unsure about any step of the process, consulting a professional is always a smart move.
Tips for Maintaining Trailer Brakes
Maintaining your trailer brakes is key to ensuring your safety and prolonging the life of your trailer. Here are some practical tips to keep them in top shape:
1. Regular Inspections
Make it a habit to inspect your brakes regularly. Look for wear and tear on brake pads, drums, and rotors, and check for any signs of rust or damage.
2. Keep Them Clean
Use a quality brake cleaner to remove dirt, grime, and grease from the brake assembly. This helps maintain optimal braking performance and prevents buildup that can cause damage.
3. Adjust When Necessary
Especially for drum brakes, ensure they are properly adjusted. Over time, brakes can become too loose or too tight, affecting performance.
4. Monitor Brake Fluid
Check the brake fluid levels periodically and top up if needed. Also, replace the brake fluid according to the manufacturer's recommendations to prevent moisture buildup, which can lead to brake failure.
5. Check for Leaks
Regularly inspect the brake lines and couplings for leaks. Even a small leak can lead to a loss of hydraulic pressure, making your brakes less effective.
6. Listen for Noises
Pay attention to any unusual sounds when braking, such as squealing or grinding. These noises can be early warning signs of brake wear or damage.
7. Feel for Changes
Be aware of any changes in the braking performance, such as the trailer pulling to one side when braking or the brake pedal feeling spongy. These could indicate problems that need immediate attention.
8. Replace Worn Parts Promptly
Don't delay replacing worn or damaged brake parts. Using worn brakes not only puts you at risk but can also cause further damage to your braking system.
9. Use High-Quality Replacement Parts
When replacing brake components, opt for high-quality parts that meet or exceed OEM specifications. This ensures reliability and longevity of your braking system.
10. Seek Professional Help When Needed
If you're ever unsure about the condition of your brakes or how to perform maintenance, don't hesitate to consult with a professional. It's better to be safe than sorry.
Keeping Safe on the Road
Looking after your trailer brakes is your ticket to safe travels, no matter where you're headed. Whether you're pulling a load for work, heading out on a weekend adventure, or anything in between, making sure your trailer's brakes are in good shape is crucial for keeping things safe on the road. That's why it's also so important to not skimp on quality when you're picking out new brake parts. Get parts only from trusted dealers like Norstar Company. Known for their top-notch trailer parts and accessories, Norstar is the go-to for reliable brake components that you can trust to do the job right.
Taking care of your trailer's brakes by sticking to a regular maintenance schedule and choosing quality parts, like those from Norstar Company, means you're all set for smooth and safe journeys ahead.
Repacking the wheel bearings on your utility or boat trailer is quick and easy, and you'll avoid the breakdown that'll leave you stranded along the road. How many trailers have you seen on the side of the road this year with one wheel propped up? Don't let it happen to you. If you haven't checked your wheel bearings lately, read this article. You can complete this simple task in about an hour and save yourself a big repair bill.
Many trailer manufacturers recommend this maintenance every year if your trailer gets normal use, or at least every 20,000 miles. To do this job, you’ll need a jack, a pair of jack stands, a large flat-head screwdriver, a hammer and a needle-nose pliers, clean rags, a small pan, about a quart of kerosene and a spray can of brake cleaner.
First, loosen the lug nuts on one wheel and raise the side of the trailer with a jack. Support the trailer with jack stands and then spin the wheel and listen to the trailer bearings. If the wheel spins freely and quietly, proceed with repacking the bearings. If you hear friction or a growling sound, you most likely have a bad bearing or spindle. If this is the case, take the trailer to a service center to get the trailer bearings replaced.
Step 1
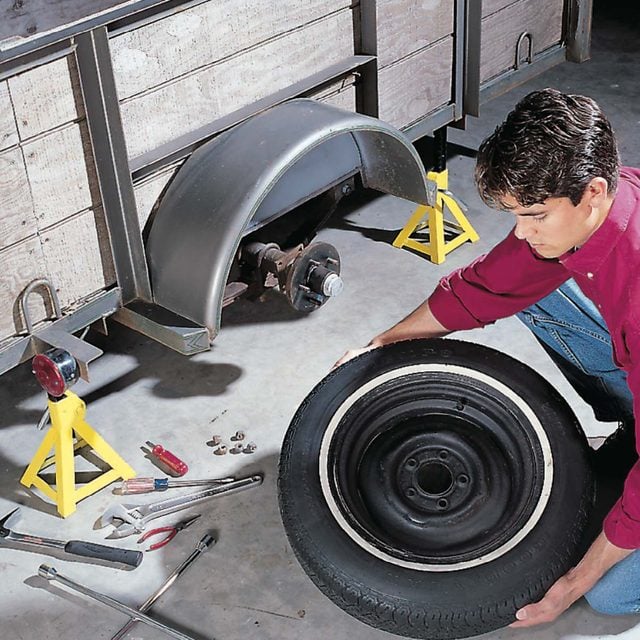
Remove the lug nuts and the wheel. Be sure that the trailer is supported with jack stands and the opposite wheel is blocked.
Step 2
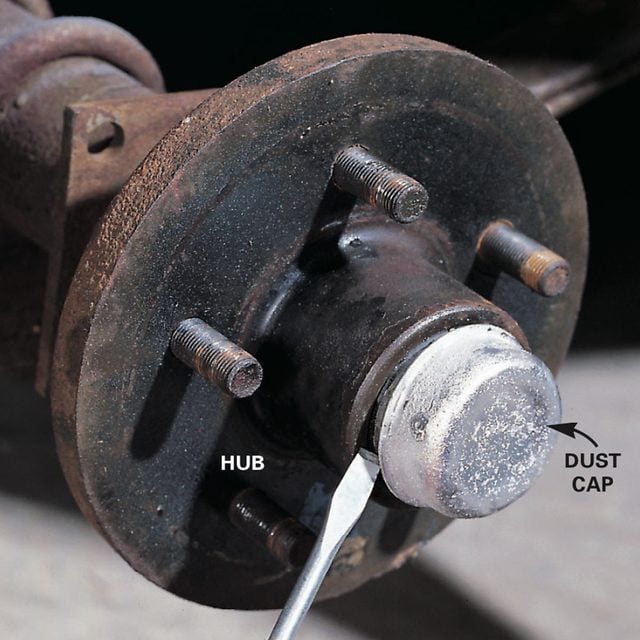
Pry the dust cap loose with a large screwdriver.
Step 3
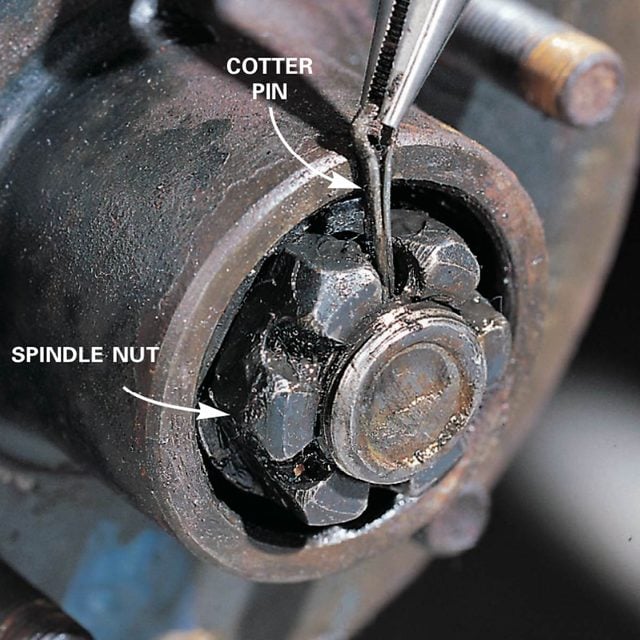
Straighten the ends of the cotter pin and pull it out with needlenose pliers.
Step 4
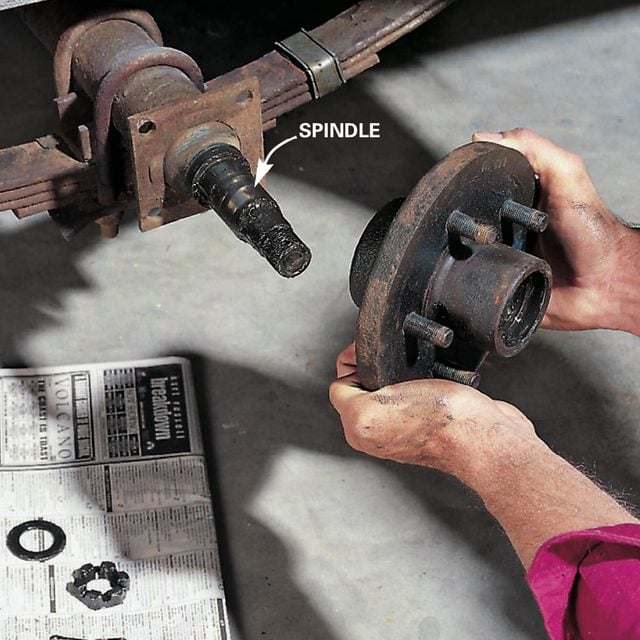
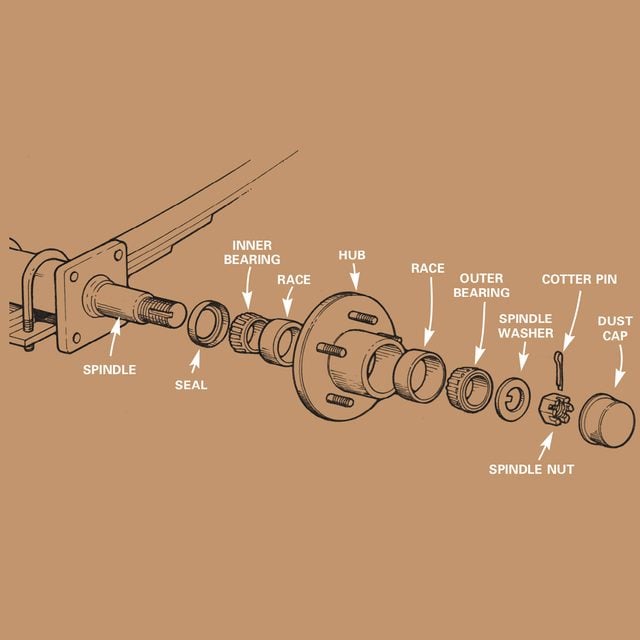
Remove the retaining nut and washer, then pull the hub off the spindle. Be careful—the trailer bearings will come out with the hub. Set the bearings on clean newspaper.
Step 5
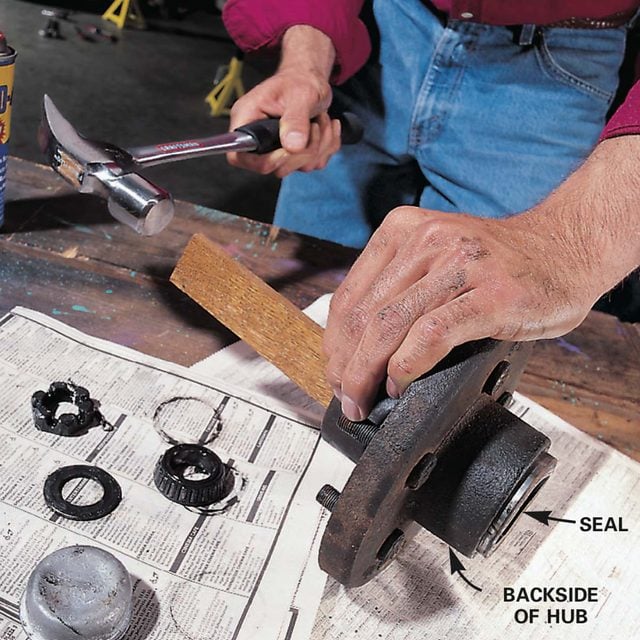
To remove the rear bearing and seal, tap along the rim of the bearing with a block of wood and a hammer. If the seal is rusted to the back of the hub, spray a little WD-40 on the back to help loosen it. If the seal is damaged, replace it. Clean all the grease from the bearings, races and seal with a brush in a small pan of kerosene. Inspect them for signs of wear and replace them if they look suspect. Once the bearings and parts are clean, spray them with brake cleaner and set them aside to dry. Wipe the spindle and the inside of the hub with a clean rag to remove all the grease, and clean them with brake cleaner as well.
Step 6
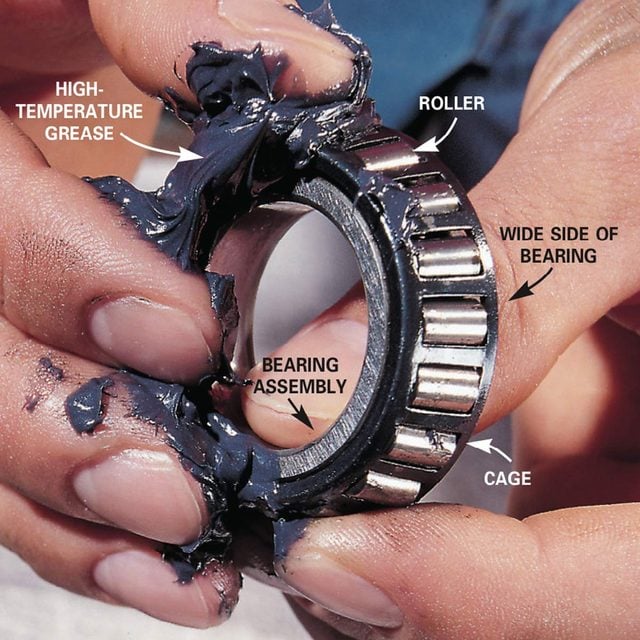
Push the grease into the bearings, working from the wide side of the bearing. Keep pushing the grease into the roller until the cage and rollers are filled. Next coat the inside of the hub with grease. Tap the seal back onto the rear of the hub with a block of wood and hammer, and install the hub and bearings back on the spindle.
Step 7

Thread the nut back onto the spindle and turn it clockwise. Spin the hub a few times as you tighten to make sure the bearings are seating properly. Tighten the nut firmly. Now back the nut off about an eighth of a turn until the hole in the spindle aligns with a space in the nut. Push in a new cotter pin (available at hardware and auto parts stores) and bend the ends of the pin to keep it from working its way out. Tap the dust cap back into place. Coat the lug threads with anti-seize compound, reinstall the wheel and tighten the lug nuts. Do the same for each wheel.
Bumper Pull vs. Gooseneck Trailers: How to Choose the Right One
When it comes to hauling, choosing the right trailer is crucial for safety, efficiency, and convenience. Two common options are bumper pull and gooseneck trailers. Each has its own advantages and disadvantages, depending on your specific needs. Here’s a breakdown to help you decide which one is right for you.
What is a Bumper Pull Trailer?
A bumper pull trailer, also known as a tag-along trailer, is hitched to a standard receiver hitch at the back of a towing vehicle. These trailers are common for smaller loads and are widely used for recreational and light commercial purposes.
Pros of Bumper Pull Trailers:
Cons of Bumper Pull Trailers:
What is a Gooseneck Trailer?
A gooseneck trailer connects to a hitch inside the bed of a pickup truck. This type of hitch provides a more stable and secure connection, allowing for greater control and higher weight capacities.
Pros of Gooseneck Trailers:
Cons of Gooseneck Trailers:

Which One Should You Choose?
The best trailer for you depends on your towing needs:
Both trailer types have their own strengths, so consider your towing requirements, vehicle capabilities, and budget before making a decision. Ensuring you choose the right trailer will make your hauling experience safer and more efficient!